There are several ways to invoke parallel tasks. This section reviews the various available techniques, starting with the Parallel.Invoke method.
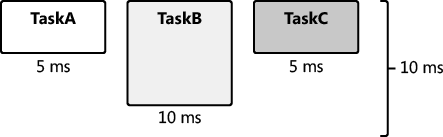
Let us assume that you have three methods (MethodA, MethodB, and MethodC)
that have separate data input. If the methods execute sequentially, the
execution time would be the sum of the duration of each method, as
shown in the following image. In this example, the total time to execute
the methods sequentially is 20 milliseconds (ms).

MethodA, MethodB, and MethodC have no dependencies. When the methods are converted to tasks, the tasks are completely independent, and they are said to be embarrassingly parallel.
This is important because it means that the tasks can run in parallel
without any synchronization, such as a semaphore or monitor. Performance
is therefore better, and this portion of the application is more
scalable. Furthermore, synchronization can add complexity, which is
harder to maintain and debug. When a group of tasks execute in parallel,
their duration is the elapsed time of the longest task. In the
following image, TaskB takes the longest time (10 ms) to complete.
Therefore, the duration of the group of tasks is 10 ms, which is half
the duration of the related methods when they are executed sequentially
(see the previous illustration). This assumes that there are enough
processors (three, in this example) to execute the tasks in parallel and
not sequentially.
Tasks are scheduled and
then assigned to a thread. The thread is then executed by a processor.
In the past, threads—not tasks—were the basic unit of scheduling. A
thread is an asynchronous path of execution through your process. A
process is itself not active; activity is found in the threads. In fact,
the Windows operating system automatically closes a process with no
threads, because there is no reason to maintain a process that has no
potential activity. Despite this, a process is nonetheless important. It
provides the resources needed for a running program, such as the
virtual memory, the working set, and the handle table. Threads require
these resources to execute. Threads privately own resources as well,
most notably the stack and thread local storage.
1. Threads
Tasks
run on threads. Threads are the engine of your application and
represent running code. Understanding threads helps you understand
tasks. This is important because some of the overhead associated with a
task pertains to threads. Therefore, threads are especially relevant
when discussing parallel programming.
The Windows operating
system schedules threads preemptively. Threads are assigned an
adjustable priority, and in general, they are scheduled in a round-robin
fashion based on thread priority. Here are some of the reasons that a
thread might be preempted:
The thread has exceeded its time slice or quantum.
A higher-priority thread starts.
The thread places itself into a wait condition.
An input-output operation occurs.
Nothing is free—including
threads. Threads have overhead. Most of the overhead associated with a
thread involves the stack, thread local storage, and context switches.
The default stack size for each thread is one megabyte (MB). For
example, 200 threads would reserve 200 MB of memory for stack space,
which is not trivial. Thread local storage is private memory set aside
for each thread and can also be significant. In addition to the storage
overhead, threads have a performance cost: context switches. Much of
this cost is associated with switching between user and kernel mode when
swapping the running thread for another user mode thread. The cost of
context switches can reduce the benefit of additional threads.
In addition to context
switches, there are other costs, such as ramping up and destroying
threads. The Microsoft .NET Framework thread pool helps to manage these
costs and to abstract much of the complexity of creating, starting, and
destroying threads. There is one .NET Framework thread pool per managed
application. Thread pools commonly reuse threads to avoid the costs of
thread startup and destruction. When the thread is no longer required,
the operating system reassigns additional work to the thread or suspends
the thread. There is an algorithm for adjusting thread pool size
dynamically based on thread utilization and other factors. The .NET
Framework 4 thread pool is the default scheduler for parallel tasks in
the .NET Framework. When you start a task, it is scheduled to run and
placed in a queue as part of the thread pool. Later, the task is
dequeued and assigned to run on an available thread. Fortunately, most
of this activity is transparent to you.
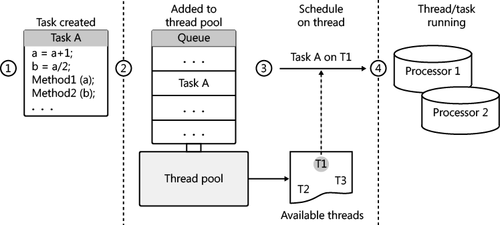
To recap: A task is a
group of related statements. When started, tasks are added to a queue in
the thread pool. Eventually (maybe immediately), a task is executed on a
thread, which is a unit of execution. This is, of course, a thread from
the thread pool. Each thread is assigned to and executed initially on a
particular processor, which is considered the processor unit. The
following diagram shows the relationship between a task, a thread, and a
processor.
2. The Task Class
In the .NET Framework, the Task
class is a logical abstraction of a task. You can use this class to
schedule and ultimately execute a parallel task. Remember, tasks are
unlike threads in that you do not start a task directly. By default, the
thread pool schedules a task, places it on a queue in the thread pool,
and eventually executes the task on an available thread.
2.1. Using the Parallel.Invoke Method
You can schedule a task in several ways, the simplest of which is by using the Parallel.Invoke method. The following example executes two parallel tasks—one for MethodA and another for MethodB. This version of Parallel.Invoke accepts an array of Action delegates as the sole parameter. Action delegates have no arguments and return void.
Parallel.Invoke(new Action[] { MethodA, MethodB });
The Parallel.Invoke method is convenient for executing multiple tasks in parallel. However, this method has limitations:
Parallel.Invoke creates but does not return task objects.
The Action delegate is limited—it has no parameters and no return value.
Parallel.Invoke is not as flexible as other solutions and always uses an implied Task.WaitAll method, described in more detail later in this section.
Parallel.Invoke does not guarantee the ordering of task execution. In the previous example, the task for MethodB might execute first. When ordering is required, dependency is implied. You should avoid task dependencies whenever possible.
The Parallel.Invoke method does not return until the provided tasks have completed. For example, consider the use of Parallel.Invoke to execute two tasks. The first task’s duration is 500 ms, and the duration of the second task is 250 ms. Parallel.Invoke will return in 500 ms. In other words, the duration of Parallel.Invoke
is the execution time of the longest-running task.
2.2. Using the TaskFactory.StartNew method
Another way to execute a task is to use the TaskFactory.StartNew method. The TaskFactory class is an abstraction of a task scheduler. In the Task class, the Factory property returns the default implementation of the task factory, which employs the .NET Framework 4 thread pool. TaskFactory has a StartNew method for executing tasks using the default task factory. Here is sample code that executes two tasks by using TaskFactory.StartNew.
var TaskA = Task.Factory.StartNew(MethodA);
var TaskB = Task.Factory.StartNew(MethodB);
Like the Parallel.Invoke method, TaskFactory.StartNew uses an Action delegate. Unlike the Parallel.Invoke method, TaskFactory.StartNew
returns immediately. There is no implied wait. Therefore, how do you
know when the task or tasks have completed? Fortunately, the StartNew returns a Task object. You can explicitly wait for a single task by using the Task.Wait
method, which is an instance method. A thread waiting on a task is
considered to be the joining thread. If the task has already completed, Task.Wait
returns immediately. Otherwise, the joining thread will wait (block)
until the task has completed. Here’s sample code that executes and waits
on a single task.
var TaskA = Task.Factory.StartNew(MethodA);
TaskA.Wait();
The previous example waited on a single task. You can also wait for
multiple tasks. After all, an application is not very parallel with a
single task. There are two options for waiting for multiple tasks: wait
for all the tasks to complete, or wait for any task to complete. Task.WaitAll waits for all tasks to complete. Task.WaitAny returns when any of the referenced tasks have completed. Both methods accept an array of tasks as a parameter. Both Task.WaitAll and Task.WaitAny methods are static methods of the Task class.
Create two tasks from separate methods and wait for both tasks to complete
Create a console application. Before the Main function, add a MethodA and MethodB method. Each method should display the name of the method by using Console.WriteLine.
static void MethodA() { Console.WriteLine("MethodA"); }
static void MethodB() { Console.WriteLine("MethodB"); }
In the Main function, create and start two tasks with the TaskFactory.StartNew method. Initialize the tasks with the MethodA and MethodB methods.
var TaskA = Task.Factory.StartNew(MethodA);
var TaskB = Task.Factory.StartNew(MethodB);
You can now wait for both methods to complete with the Task.WaitAll method.
Task.WaitAll(new Task[] { TaskA, TaskB });
Add Console.ReadLine() call to the end of the Main method to prevent the console from closing before you can see the output. Your completed code should look like the following.
class Program
{
    static void MethodA() { Console.WriteLine("MethodA"); }
    static void MethodB() { Console.WriteLine("MethodB"); }


    static void Main(string[] args)
    {
        var TaskA = Task.Factory.StartNew(MethodA);
        var TaskB = Task.Factory.StartNew(MethodB);
        Task.WaitAll(new Task[] { TaskA, TaskB });
        Console.ReadLine();
    }
}
Run the program. You should see the output from both tasks in the console window.

The example you just completed uses the Task.WaitAll method to wait for both tasks to complete. In contrast, the Task.WaitAny method returns as soon as any task completes. You can discover which task completed because Task.WaitAny returns a zero-based index into the Task array that was provided as a parameter. The array index identifies the task that completed.
You used the Console.ReadLine
method to prevent the console window from closing. Of course, this
makes it easier to view the results. Alternatively, you can execute the
application in Release mode, which you can do by using the shortcut
Ctrl+F5. This prevents the addition of an extraneous line of code.
Either technique is okay.
In the previous example, you
waited for all tasks to complete. In this tutorial, you just wait for
the first task to complete. You will then display the task ID of that
task.
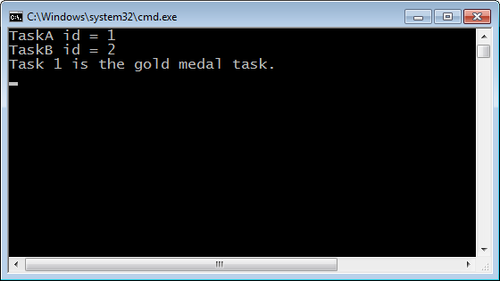
Create two tasks and wait for just the first one to complete
Create a new console application. At the top of the source file, reference the System.Threading and System.Threading.Tasks namespaces. Before the Main function, add a MethodA and MethodB method. To emulate a compute bound task, you will ask each task to simply spin and burn processor cycles by using the static Thread.SpinWait method.
static void MethodA() { Thread.SpinWait(int.MaxValue); }
static void MethodB() { Thread.SpinWait(int.MaxValue/2); }
In the Main function, create two tasks with the TaskFactory.StartNew method. Initialize the tasks with the MethodA and MethodB methods.
var TaskA = Task.Factory.StartNew(MethodA);
var TaskB = Task.Factory.StartNew(MethodB);
Display the ID for each task.
Console.WriteLine("TaskA id = {0}", TaskA.Id);
Console.WriteLine("TaskB id = {0}", TaskB.Id);
Now create an array of tasks. Call Task.WaitAny to wait until either task has run to completion. Initialize an integer variable with the return value.
Task [] tasks=new Task[] {TaskA, TaskB};
int whichTask = Task.WaitAny(tasks);
WaitAny
returns a zero-based index into the task array, which identifies the
task that has finished. In this example, you can use the index to
display the task ID of that task.
Console.WriteLine("Task {0} is the gold medal task.",
   tasks[whichTask].Id);
Keep the console open and prevent the application from exiting by using a Console.ReadLine= statement at the end of the application.
Here is the completed code:
using System;using System.Collections.Generic;
using System.Linq;
using System.Threading;
using System.Threading.Tasks;
namespace TwoTask_WaitAny
{
class Program
{
static void MethodA() { Thread.SpinWait(int.MaxValue); }
static void MethodB() { Thread.SpinWait(int.MaxValue/2); }
static void Main(string[] args)
{
var TaskA = Task.Factory.StartNew(MethodA);
var TaskB = Task.Factory.StartNew(MethodB);
Console.WriteLine("TaskA id = {0}", TaskA.Id);
Console.WriteLine("TaskB id = {0}", TaskB.Id);
var tasks=new Task[] {TaskA, TaskB};
int whichTask = Task.WaitAny(tasks);
Console.WriteLine("Task {0} is the gold medal task.",
tasks[whichTask].Id);
Console.WriteLine("Press enter to exit");
Console.ReadLine();
}
}
}
Run the application. This time, when either of the methods completes, the Console.WriteLine code will show a message containing the ID of the task that finished first. Based on your code, TaskB will finish first.
Be careful with the Wait methods: Wait, WaitAll, and WaitAny.
There is always a possibility of waiting longer than you expect; you
might even deadlock. For that reason, you should always consider using
the versions of these methods that have a time-out parameter. You can
then set a reasonable duration for the task to complete. When the task
exceeds the duration, the Wait method will time out and return false.
It is important to note that the task itself is not aborted and might
run until completion. However, you are no longer waiting. In this
circumstance, you might decide to cancel the task.
Because the Wait
method has a time-out, using the following code is safer than using the
code in the previous examples. The task must complete in the allotted
time, or the wait will be released. The joining thread is then allowed
to continue.
var TaskA = Task.Factory.StartNew(MethodA);
if (!TaskA.Wait(5000)) {
    Console.WriteLine("Task timed out");
}
2.3. Using the Task.Start Method
There is yet one more way to directly start a task. You can create an instance of the Task class and call the Task.Start method, which is an instance method. One advantage is that you can configure the task in the Task constructor before starting the task. Several of the options, as defined in the TaskCreationOption enumeration, are particularly helpful. The following table lists the options.
| Option | Explanation |
|---|
| PreferFairness | This is a suggestion to the TaskScheduler that tasks should execute in an order similar to when they were scheduled. |
| LongRunning | In the .NET Framework 4, long-running tasks are scheduled on threads not in the thread pool. |
| AttachToParent | This initiates a task inside another task to create a subtask. |
This example code demonstrates a couple of these options.
var TaskA = new Task(MethodA, TaskCreationOptions.LongRunning);
var TaskB = new Task(MethodB, TaskCreationOptions.PreferFairness);

TaskA.Start();
TaskB.Start();
The
.NET Framework 4 thread pool is optimized for short tasks. For this
reason, long-running tasks can adversely affect the performance of the
.NET Framework 4 thread pool. Use the TaskCreationOption.LongRunning option to schedule a long-running task on a dedicated thread that is not part of the thread pool.
The .NET Framework thread
pool does not promise to execute tasks in order; more often than not,
tasks will run out of sequence. Therefore, you cannot predict the order
of execution and should not write code predicated on this requirement. TaskCreationOptions.PreferFairness is a task option that indicates a preference to execute a task in its natural order. However, TaskCreationOptions.PreferFairness is merely a suggestion to execute a task in order, not an absolute directive to the Task Parallel Library (TPL).
2.1.3. Using Function Delegates
Action
delegates have no parameters and do not return a value. In some
circumstances, this might be inflexible and limiting. For tasks, you can
also use the Func<TResult> delegate, where TResult is the return type. When the task completes, the return or result of the task is accessible with the Task<TResult>.Result property. You can check for the result at any time. However, if the task has not completed, accessing the Task<TResult>.Result
property will block the joining thread until the task is done.
Execution will resume after the task has finished, when the result is
returned.
In the next example, a task
returns the value 42, which is the answer to life, the universe, and
everything . Task<int> indicates that the task returns an integer value.
Lambda expressions are
convenient for relatively short tasks.
Create a task that uses a lambda expression
Create a new console application. In the Main function, create and start a new task by using the TaskFactory.StartNew method. The task will return an integer value. In the TaskFactory.StartNew method, initialize the task with a lambda expression. In the lambda expression, return the value of 42.
var TaskA = Task<int>.Factory.StartNew(() => {
   return 42; });
You can now wait for the task with the TaskA.Wait method.
TaskA.Wait();
Display the result of the task with the Task.Result property.
Build and run the application.
Here is the complete application.
class Program
{
    static void Main(string[] args)
    {
        var TaskA = Task<int>.Factory.StartNew(() =>
        {
            return 42;
        });
        TaskA.Wait();
        Console.WriteLine(TaskA.Result);
    }
}
Here is another example of starting a task that returns a value. Different from the previous example, this code initializes the Task object in its constructor with a function delegate. Task.Start then executes the task.
Task <int> TaskA=new Task<int>(() => {
    return 42;
});
TaskA.Start();
You now know how to execute a
task that has a return value. You might also want to pass information
into the task. You pass state information for a task as an additional
parameter—the object type (the state information can be any type). The
next example employs TaskFactory.StartNew to execute a task. The first parameter is the task, and the second parameter is the state.
Create a task that uses a state object, which in this example is a string
Create a console application. In the Main function, create and start a new task by using the TaskFactory.StartNew
method. Initialize the task with a lambda expression. Pass the state
object into the lambda expression as a parameter. In the lambda
expression, return the length of the lambda expression.
var TaskA = Task<int>.Factory.StartNew(val => {
return ((string)val).Length;},
The next parameter of this version of the TaskFactory.StartNew method is the state object. You will provide a string value.
"On Thursday, the cow jumped over the moon.");
You are ready to wait for the task, which is done with the Task.Wait method. You can then display the result of the task by using the Task.Result property. Of course, the answer remains 42, since that is truly the answer to life, the universe, and everything.
Build and run the application.
Here is the complete application.
class Program
{
    static void Main(string[] args)
    {
        var TaskA = Task<int>.Factory.StartNew(val => {
            return ((string)val).Length;},
            "On Thursday, the cow jumped over the moon.");
        TaskA.Wait();
        Console.WriteLine(TaskA.Result);
    }
}
Here’s an altered version of the previous example. Instead of using TaskFactory.StartNew, the task constructor initializes the state object.
var TaskA=new Task<int>(val =>{
    return ((string)val).Length;
}, "On Thursday, the cow jumped over the moon.");

TaskA.Start();